
How to Perform the Sea Simulation Module
This quick guide provides information on how to perform the Sea Simulation module on the Virtualis BalanceVR, PhysioVR, and MotionVR solutions. For additional information, please refer to the Sea Simulation user manual.
Equipment needed
To view the equipment needed, click on the “i” icon in the upper right corner of the module. To perform the Sea Simulation module, you will need the VR headset. You also have the option to perform the module with the MotionVR.
Patient setup
Depending on the patient’s therapeutic goals, they can sit or stand to perform this module.
1. Open a patient profile.
2. Click on “Start a session” to access the module list.
3. Type “Sea Simulation” in the search bar. The first three letters are often enough.
4. Click on the Sea Simulation button to launch the module.
5. Select the initial settings based on your patient’s therapeutic goals.
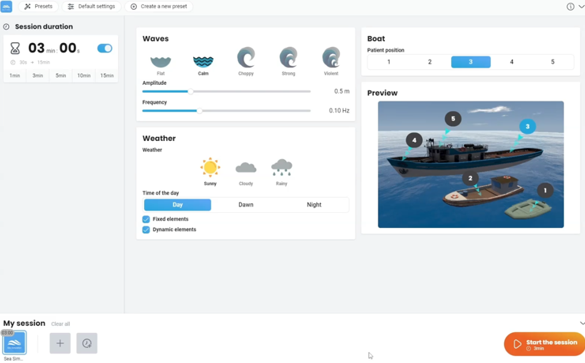
- Session duration: choose a preset time option or create your own value.
- Waves presets: change intensity of amplitude and frequency of waves.
- Weather:
- Presets: sunny, cloudy, raining.
- Time of the day: day, dawn, night.
- Fixed elements: click to have island present in front of boat.
- Dynamic elements: click to have birds present in the air.
- Boat:
- Patient position: preference preview screen for location of patient’s view. 3 is the default.
6. The goal of the module is to decrease a patient’s symptoms through progressive habituation. You should monitor your patient’s symptoms closely throughout the activity.
Test procedure
7. Once settings have been finalized, click on “Start the session”.
8. The module begins automatically.
9. Have the patient look forward and press “C” on the keyboard to center the image inside the VR headset.
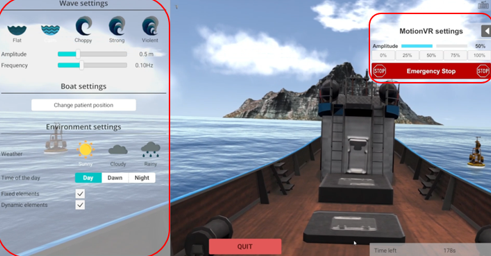
10. Perform real time progressions by changing the parameters on the left side of the clinician screen. Patients cannot see these adjustments.
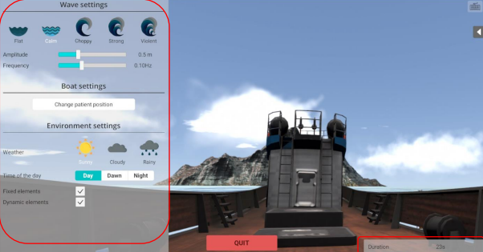
If you are using the MotionVR, parameters will also be on the right side of the screen.
- Wave amplitude: increase height of waves.
- Wave frequency: increase number of waves.
- Boat settings: change patient position by clicking on the “Change patient position” button.
- Environment settings: change weather, time of day, fixed and dynamic elements.
- MotionVR settings: change percentage of dynamic force plate.
In general, increasing the wave amplitude and frequency, moving positions from large boat to medium boat to small boat, changing weather from sunny to cloudy to raining, changing time of day from day to dawn to night, removing fixed elements, and adding dynamic elements will increase the complexity of the task.
11. Click the keyboard icon in the upper right corner to view information about shortcut keys.
12. No results are provided for this module.
Presenter
