
How to Perform the Motion Program Module
This quick guide provides information on how to perform the Motion Program module on the Virtualis MotionVR solutions. For additional information, please refer to the Motion Program user manual.
Equipment needed
To view the equipment needed, click on the “i” icon in the upper right corner of the module. To perform the Motion Program module, you will need the MotionVR. The VR headset is optional for this module. However, if you do not use the VR headset, you will need a secondary screen to perform in “Screen Mode.”
Patient setup
The patient will need to be standing to perform this module.
1. Open a patient profile.
2. Click on “Start a session” to access the module list.
3. Type “Motion Program” in the search bar. The first three letters are often enough.
4. Click on the Motion Program button to launch the module.
5. Select the initial settings based on your patient’s therapeutic goals.
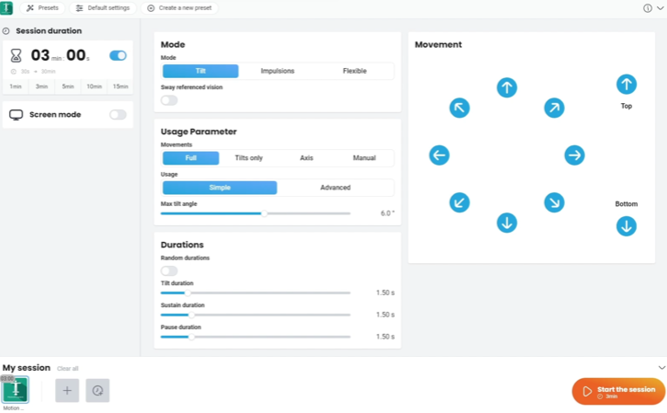
- Session duration: choose a preset time option or create your own value.
- Mode: choose which type of force plate movement you want to occur:
- Tilt: The force plate will move in a direction, pause and then return to center.
- Impulsions: The force plate will quickly move in a direction and quickly return to center.
- Flexible: The force plate will be “unlocked”. The patient will have control over the direction of force plate movements.
- Sway referenced vision: Select if you would like the image in the VR headset to be locked in play for a visual-vestibular conflict.
- Usage parameters: settings for the direction of force plate movements:
- Movements: preset direction choices:
- Full: All movements included.
- Tilts only: Only diagonal directions included.
- Axis: Only forward/backward/left/right directions included.
- Manual: Manually select the directions.
- Usage
- Simple: Directions are preset.
- Advanced: Ability to change degree of each individual direction.
- Max tilt angle: Maximum angle of movement, in degrees.
- Durations: settings for speed of force plate movements:
- Random: Select to have variable force plate speeds.
- Tilt: Length of time, in seconds, to complete the initial force plate movement.
- Sustain: Length of time, in seconds, of the pause.
- Pause: Length of time, in seconds, in between directions.
- Movements: preset direction choices:
Test procedure
6. Once settings have been finalized, click on “Start the session”.
7. If using the VR headset, have the patient look forward and press “C” on the keyboard to center the image inside the VR headset before starting the module.
8. Instruct the patient that the goal of the module is to maintain their balance during the force plate movements but keeping the marble inside the blue circle.
9. Press “Start” to begin the module.
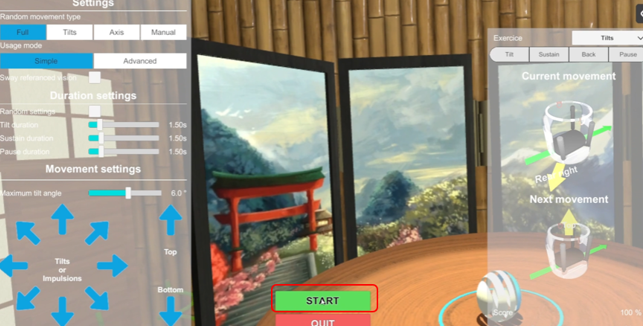
10. Perform real time progressions by changing the parameters on the left side of the clinician screen (see below). Patients cannot see these adjustments.

- Maximum tilt angle: increase or decrease the amount of force plate movement.
- Movement type: select more or less force plate directions by changing “random movement type” or manually selecting the blue arrows.
- Duration settings: increase or decrease the speed of force plate movements either by changing the tilt, sustain or pause durations.
- Exercise (on right side of screen): change type of force plate movement from tilt, impulsions or flexible.
In general, increasing the maximum tilt angle, decreasing the duration settings, and changing the exercise type from flexible to tilt to impulsions will increase the complexity of the task.
View results
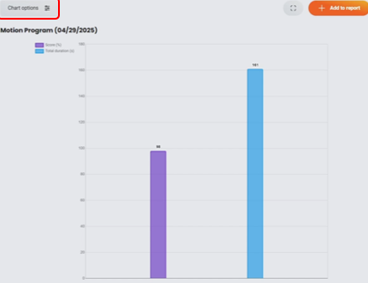
11. When the module is complete, you can view the results by clicking on the histogram icon.
![]()
Default data points: score (%) based on the amount of time the patient was able to maintain the marble in the middle of the blue circle, total duration (seconds) the patient performed the module.

You can also access additional results by clicking “Chart options”.
Presenter
