

Creating a TEOAE Pass/Refer Test Protocol
This quick guide outlines the procedure for creating a pass/refer TEOAE test protocol. Parameters and settings should be based on an appropriate pass/refer criterion.
- From the TEOAE tab, go to Menu | Setup | Protocol setup.
- In the Protocol setup screen, click on New and type in the desired protocol name.
- From the Available tests box, double click on TEOAE. TEOAE (Unconfigured) will now appear in the Selected tests box.
- Click on the Settings button below the Selected tests box.
- Select the band method from the Method box. Enter the specific frequency bands for custom bands.

- The Basic and Advanced tabs offer options to change the stimulus type (non-linear click is almost always used), stimulus level, high pass filter, level tolerance and set the Acceptable noise level (level above which OAE recording will be rejected due to noise). Choose to measure at ambient or peak pressure.

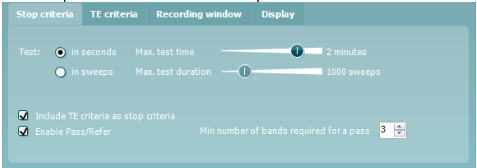
- Under the Common test settings – Stop criteria tab, select the following:
- Test time – select from a maximum test time or maximum number of sweeps.
- Include TE criteria as stop criteria – this box should remain checked to include the TE criteria as stop criteria.
- Enable Pass/Refer – check this box and accept the disclaimer.
- Minimum number of bands required for a pass – select the minimum number of bands required to label the result as a pass.
- Under TE criteria, the following can be set:
- Min SNR – the minimum signal-to-noise ratio that must be reached.
- Mandatory – specific frequency bands that must be detected for a pass.
- Min sweeps – the minimum number of sweeps that must be recorded.
- Min total OAE – the minimum total OAE value (0 to +30).
- Min reproducibility – the minimum reproducibility between the A & B waveforms.
- Min TE level – the minimum acceptable absolute OAE level in SPL.

- Under Recording Window – set the recording window and the wave reproducibility window. The stimulus rate will be displayed as changes to the recording window are made.
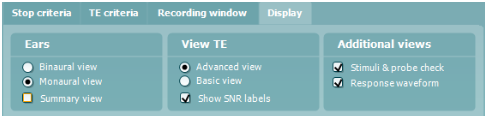
- Under Display, the following can be set:
- Ears – select whether to show one ear or both ears on screen. The summary view displays the test and band summary in table format.
- View TE – select to display the result in a basic view (OAE detected or not) or advanced view (displays OAE and noise). Select to show SNR numbers.
- Additional views – select whether to display the stimuli & probe check or the response waveform on screen.
- Once all settings have been selected. Press OK to close the Protocol setup window.
- Press Apply and OK to save the protocol and return to the test screen.
Note: Screen-shots in this document are a guide only and are not recommended settings for a TEOAE pass/refer protocol. Refer to the Titan Additional Information document for a more detailed description of the various criteria.
Presenter
Interacoustics