
How to switch between streaming modes on the HTC Focus Vision VR headset
This quick guide provides information on how to switch between the wireless and wired streaming modes on the HTC Vive Focus Vision VR headset.
Switching from wireless to wired streaming
1. Ensure the VIVE wired streaming kit is connected to the computer.
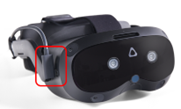
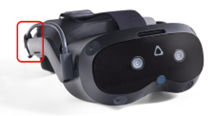
2. Connect the wired streaming cable to the USB-C port on the right side of the VR headset with the cable oriented upwards.
3. Fasten both hook-and-loop cable wraps behind the built-in speaker. Make sure to fasten them with the fuzzy side out to avoid tangling with hair.
4. Inside the VR headset, a new window will appear. With a controller, select “VIVE Streaming (DP mode)” in the headset.
5. You will then enter the Virtualis home screen. You can now remove the VR headset.
6. On the computer, the USB icon on the VIVE Business Streaming Application will turn red.

7. Launch the Virtualis application.
Switching from wired to wireless streaming
1. Remove the hook-and-loop cable wraps from the side of the VR headset.
2. Disconnect the wired streaming cable from the USB-C port on the right side of the VR headset.
3. Inside the VR headset, a window will appear. Using a controller, select “OK.”
4. Another window will appear. Using a controller, select “VBS server” from the list.
5. You will then enter the Virtualis home screen. You can now remove the VR headset.
6. On the computer, the USB icon will change to a white Wi-Fi icon.

7. Launch the Virtualis application.
Presenter
