
12 tips for using the Interacoustics Eclipse
When I first graduated as a Master of Science in Audiology in 2020, I started as an Audiologist at the University Hospital in Odense, Denmark. Here, I used the Interacoustics Eclipse almost every day on infants and adults. Even though I knew the software and equipment well before joining Interacoustics as a Clinical Product Manager in 2022, I’ve since learned many new and smarter ways of working with the Eclipse.
Based on my experiences here at Interacoustics and in the clinic, I have made a list of 12 of my favorite tips for using the Eclipse.
1. Aided cortical testing
In the fall of 2024, it was very exciting to launch the Aided Cortical module for the Eclipse.
When working with the pediatric population, it is crucial to ensure that patients who are unable to describe the perceived benefit of their device still receive proper auditory input. By performing aided cortical testing, you are able to validate the fitting of the patient’s hearing device by measuring cortical responses recorded from the auditory cortex.
The speech sounds used as stimuli in the Aided Cortical module are presented with reference to the International Speech and Test Signal (ISTS), therefore mimicking how speech is presented to the patient in the real world.
To help assist in the evaluation of a response being present, the Aided Cortical module uses the Fmpi™ detector, which is specifically designed to detect aided cortical responses.
2. Add to current session
Another feature from the fall of 2024 is ‘add to current session’, which allows you to keep working on a session even after you have saved and exited the EP software. To use this feature, you must choose the protocol you are interested in to keep working in.
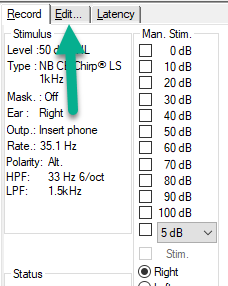
Let’s say you did an ABR yesterday using the Threshold CE-Chirp LS protocol, but time only allowed you to test the right ear, and you want to continue the test today. Then when you open the EP software, choose ‘Threshold CE-Chirp LS’ (Figure 1).

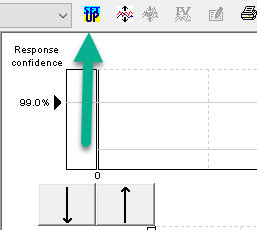
When you have chosen the protocol, use the arrows in the toolbar to find the test you want to keep working on (Figure 2).

When you have found the test, press the add to current session button (Figure 3).

The recorded data is now put into the current session, and you can now continue working. The waveforms that were imported to the current session will have a time stamp on them showing when they were imported from (Figure 4).

You cannot merge these waveforms with newly collected data.
3. Shortcuts for wave markers
There are many different shortcuts in the Eclipse that can make your work a bit easier. For example, when placing different wave markers (e.g. I, III and V for ABR or P1 and N1 for VEMP), you might click the edit tab to place wave markers (Figure 5).
However, you could also stay in the record tab and use ‘1’, ‘2’, ‘3’, ‘4’, and ‘5’ on your keyboard to place wave markers. To place a trough, hold down CTRL and press 1, 2, 3, 4, or 5.
To see the shortcuts for other functions and tools, you can hover over the different icons.
4. Save and new session
When I was working at the clinic, I did not know that you could save a session and instantly open a new. My workflow consisted of using the save and exit function, and then re-opening the EP software.
However, when you click the paper with a star on it (or hold down CTRL and press N), you save your current session and immediately open a new session (Figure 6).

5. Temporary and permanent changes
A question I often get when doing presentations on the Eclipse is: When is a change permanent or temporary?
To make a temporary change (e.g. changing polarity or rate for one session only), you do this by accessing the setup at top of the screen (Figure 7). Remember, settings changed in the temporary setup are not saved when you close the EP software.
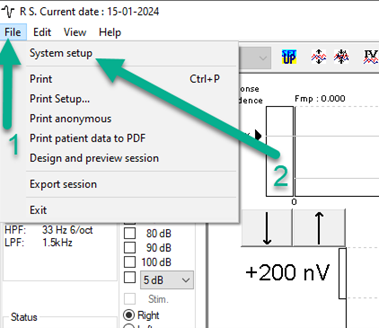
However, if you want to make a permanent change to a protocol or make your own protocol, you do this by accessing the system setup by clicking ‘File’ and ‘System setup’ (Figure 8).
6. Change rejection level during recording
You can change the rejection levels in the Eclipse while you are recording. If you double click on the EEG on the upper right corner, you will open an advanced rejection menu where you can drag the dotted vertical lines in 1-µv steps to get the rejection level you want.
In Figure 9 below, you can see the rejection is set at 17 µv. Remember the higher your rejection, the more noise you allow in the recording. By lowering the rejection, you minimize the amount of noise recorded in your waveform.
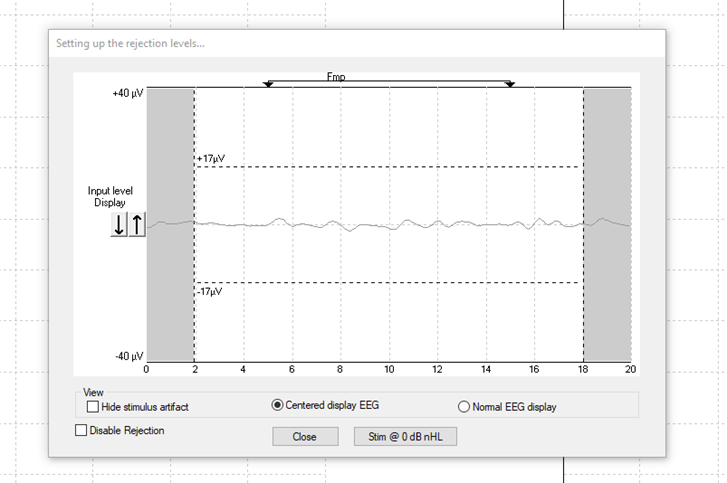
The chosen rejection is then shown to the right of each EEG channel (Figure 10).

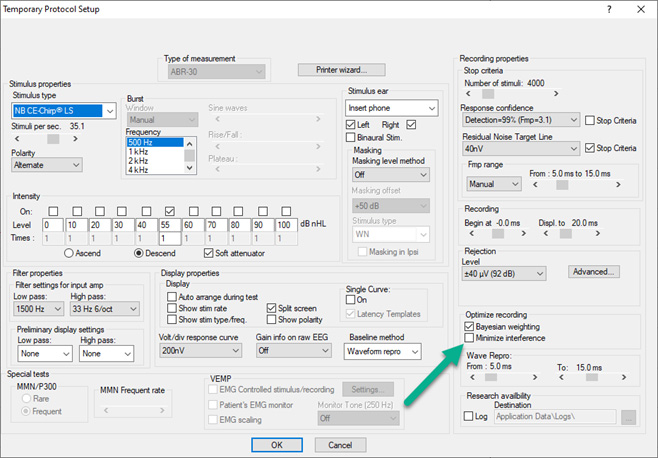
7. Minimize interference
If you find yourself in environments with periodic interferences from mains power interference, it is possible to use the Eclipse’s ‘Minimize interference’ function to make the system less sensitive to these interferences. You can find this function in the system setup (Figure 11).
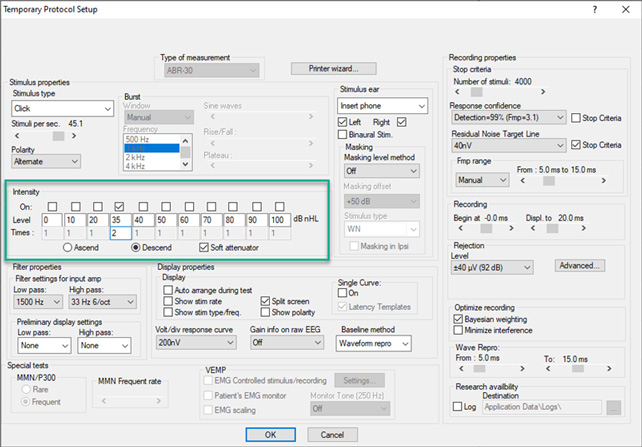
8. Queue function
If you are in the setup and look at the intensity options, then you can see a table with different intensities, if they are checked, and the number of times.
In Figure 12 below, 35 dB nHL has a checkmark and the number of times is 2. This means that intensity will be recorded two times on each ear. You can combine intensities so that you can have a queue of 80 dB nHL two times on each ear, 60 dB nHL two times on each ear and so forth. Using the ‘Ascend’ option means that the intensity will start from the lowest to the highest, and vice versa using the ‘Descend’ option.
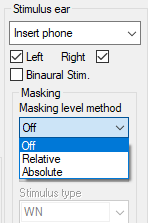
9. Masking level method
When you are using masking, there are two masking level methods in the Eclipse (Figure 13):
- Relative
- Absolute
Relative masking
The relative method increases or decreases the masking intensity based on the stimulus intensity. See Table 1 for two examples.
| Masking offset | Stimulus intensity | Masking level |
| Plus 30 dB | 60 dB nHL | 90 dB SPL |
| Minus 10 dB | 80 dB nHL | 70 dB SPL |
Table 1: Relative masking examples.
Absolute masking
The absolute method is a fixed masking intensity. If you have chosen 60 dB SPL as a masking intensity, then 60 dB SPL will always be presented no matter your stimulus intensity.
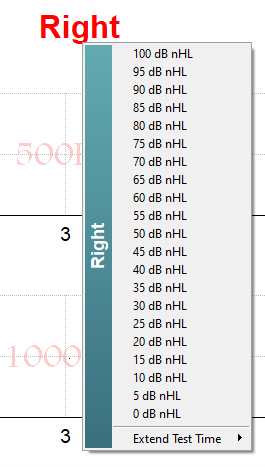
10. Change all ASSR intensities at once
You can change all ASSR intensities on each ear at the same time. You do this by right clicking on either ‘Right’ or ‘Left’ and choosing the intensity you want. Then the chosen intensity is added to the queue for all frequencies on that ear (Figure 14).
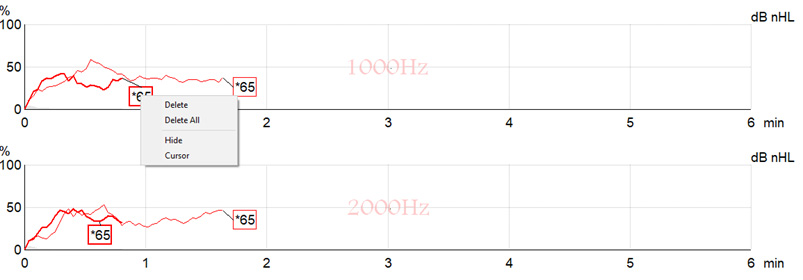
11. Delete ASSR curves
You can delete ASSR measurements if you want to clean up your test screen. You can only do this in non-saved sessions. You do this by right clicking the intensity box and pressing ‘Delete’ (Figure 15).
12. Patient preparation
As a new help, we have created ‘how to prepare the patient for’ videos for the different tests available with the Eclipse. These videos are available on our YouTube channel and on our Eclipse support page.
About the author
Rasmus Skipper, MSc Audiology, graduated from the University of Southern Denmark in 2020. Following two years of clinical practice at Odense University Hospital, Rasmus joined Interacoustics in April 2022 as Clinical Product Manager within ABR and OAE.