
Vestibular Evoked Myogenic Potentials (VEMP): A Complete Guide
Description
This guide provides clinicians with a complete introduction to VEMP testing in the clinic.
Table of contents
Related course: Getting started: VEMP
Components of VEMP
VEMP is short for Vestibular Evoked Myogenic Potentials. Let’s dive into each of these four components to understand the assessment in more detail.
1. Vestibular
VEMPs originate from the inner ear structures, which are part of the vestibular peripheral organ. We’ll discuss this further later in this guide, but they originate from the otolith receptors within the peripheral sensory vestibular system.
2. Evoked
We evoke these responses, most commonly in clinics by a stimulus such as air conduction, with bone conduction being used more frequently during the last few years. In some of the earlier literature, you’ll see we’ve used tendon hammers and mini shakers to elicit some of these responses.
3. Myogenic
In the world of audiology, VEMPs are a bit different to what we're used to measuring. They are recorded directly from the surface of a muscle and represent a change in the muscle’s state. This is a bit different to an auditory potential, although we measure them on an evoked potential system as we do for auditory potentials.
Later in this guide, we’ll discuss this in more detail in relation to both the cervical and the ocular VEMP.
4. Potential
A lot of potentials we measure in audiology are things that change in state. To measure this change, we typically think of this:
- We stimulate with air or bone conducted stimuli.
- The stimulation causes a change in state (the potential).
- We measure that difference and look at that as a reflex, or as an electrical impulse such as brain EEG, or in the case of VEMPs, a change in myogenic muscle activity which we call EMG.
Research history of VEMP
We have been aware of sound-evoked vestibular responses for quite some time. In fact, Prof. Pietro Tullio described this concept of acoustic sensitivity of the vestibular end organ almost 100 years ago in 1929.
Later in the 20th century, as research and technology developed, Prof. Georg von Békésy received a Nobel Prize for looking at sound transmission and physiology in the inner ear sensory structures in normal human subjects. This could be thought of as the turning point where sound evoked muscular responses started to gather momentum in the research.
In the latter part of the 20th century, we get to the position where we are now, with recording these potentials with evoked potential auditory detecting systems, with specific stimuli that we can use to elicit the responses and protocols to maximize the potential of recording reliable clinical results.
As far as we know in the published research so far, there are no real gender differences in terms of the VEMP characteristics. Increasing age does appear to change the required stimulus level to stimulate the VEMP. That could also be more about the change in muscular responses that we also see decline with age. We are now getting to the point where we can use different techniques where we can measure them in much older adults, and as we will discuss in more detail, EMG activity from the muscle is quite important to accurately and consistently measure the VEMP responses, especially in cervical VEMP.
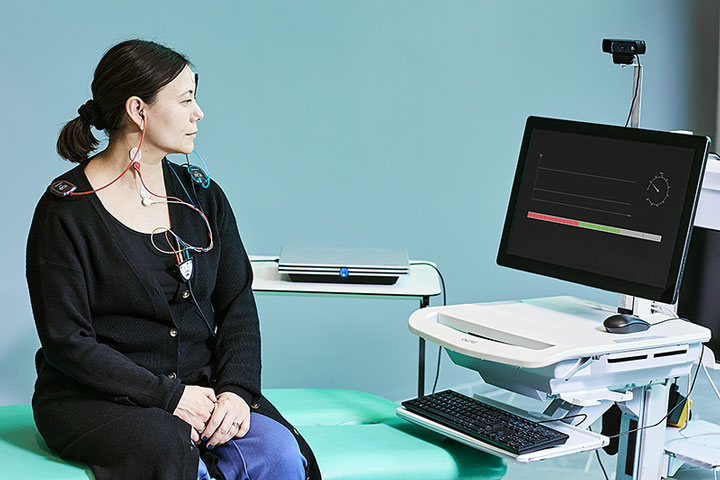
Knowing the level of EMG is critical in the measurement of the VEMP, we need to have something where we can measure the EMG – particularly in the cervical VEMP – so that we can achieve a high enough EMG level to measure that inhibitory response. And again, we have evoked potentials systems such as the Interacoustics Eclipse (Figure 1) that allow us to monitor the EMG during the cervical VEMP assessment.
Why perform VEMP testing?
We have a lot of research, background and clinical experience in recording semicircular canal responses from the peripheral vestibular sensory system. If we go all the way back to caloric responses of stimulating single ears or rotating people in chairs, for what is now probably the better part of just over 100 years, in clinics we've been routinely observing and measuring eye movements relative to stimulation of the semicircular canal for decades.
But the peripheral vestibular system also has the otolith organs as part of the sensory structures. And these different parts of the sensory system all work in a very synergistic fashion to communicate information to the brain that allows us to detect and interpret our position and movement relative to the environment. So, we need tests in clinic that can cross check the sensory systems. For example, we may have a scenario with:
- Abnormal saccular function (identified by cVEMP).
- Abnormal utricular function (identified by oVEMP).
- Abnormal semicircular canal function (identified by caloric, rotational chair, and/or video head impulse testing).
Apart from the cross checking of peripheral vestibular system function, there are certain conditions that show up quite nicely when you're looking at otolith function, such as superior semicircular canal dehiscence, where we have an opening of the inner ear structure that's allowing sound to pass through into the vestibular end organ, which causes abnormal sensitivity to sound pressure.
In bilateral vestibular loss, we might also have otolith involvement. The days of identifying bilateral vestibular loss based on one test alone are gone. We should do cross checks with tests mentioned previously in this article.
Cervical VEMP (cVEMP)
Cervical VEMPs record the function of the saccule and inferior vestibular nerve, and that's important because this is where we start to look at different components to the inner ear and vestibular end organ.
In the following, we’ll dive deeper into preparing for and performing cVEMP testing.
cVEMP pathway
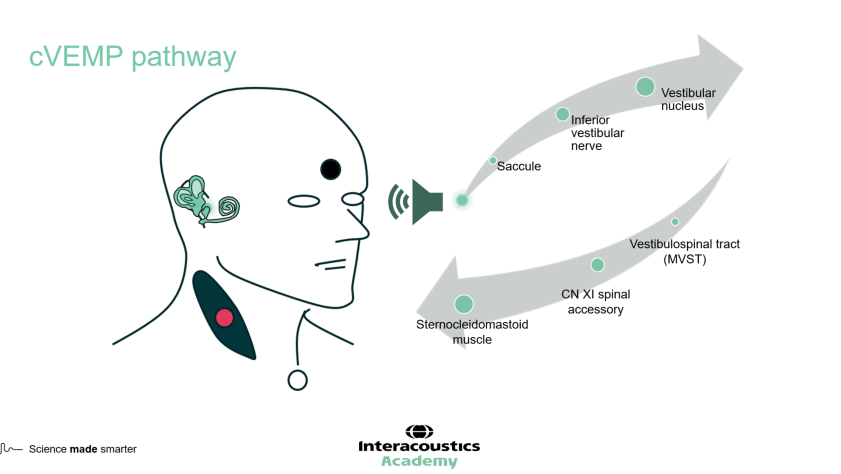
For cVEMPs, the reflex pathway is:
- Saccular otolith system
- Inferior vestibular nerve
- Vestibular nucleus
- Vestibular spinal tract
- Sternocleidomastoid (SCM) muscle
The SCM muscle in the neck is the one that measures the actual response. Cervical VEMPs are ipsilateral responses, meaning if you stimulate the right ear, you’re also recording from the right part of the neck muscles (Figure 2).
cVEMP patient preparation
There are several preparation steps you need to perform before placing the electrodes on your patient and performing the test.
1. Preparatory tests
It’s a good idea to perform a few preparatory tests, as the results can guide you in terms of what type of stimulation to use for VEMP testing. Suggestions include:
- Video otoscopy
- Pure tone audiometry
- Wideband tympanometry
2. Type of stimulation
You can use air conduction (insert earphones or supra-aural headphones) or bone conduction (B81). If your tympanometry results look normal and suggest that middle ear function is equal for both ears, we recommend using air conduction. If your tympanometry results are abnormal, you may want to use bone conduction as that will help you to overcome any middle ear dysfunction and deliver an appropriately loud amount of stimulation to measure the VEMP response.
3. Skin preparation
To ensure good contact between the electrodes, the skin and to achieve low impedances, we recommend using gauze or cotton wool with some mild abrasive paste to clean the skin. You don't need to scrub too hard, as the purpose is to remove any:
- Oils
- Makeup
- Moisturizer
- Dead skin cells
A good tip is to flip the gauze or cotton wool to wipe off any excess abrasive paste, so you have a dry surface to place and attach the surface electrode to.
When preparing the skin, it can be difficult to identify where the SCM muscles are. To make it easier to see, you can ask your patient to:
- Turn their head
- Tilt their chin down to their shoulder
- Have your patient lean their head forward and press against your hand
cVEMP electrode montage
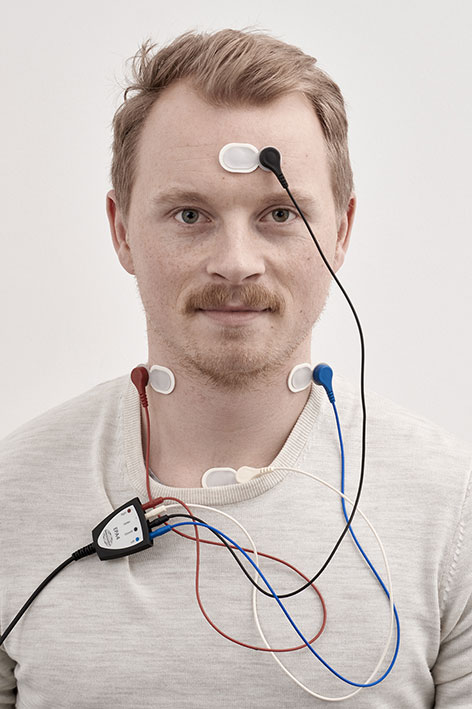
For cVEMPs, the electrode montage has four electrodes and includes:
- An electrode on each SCM muscle
- A ground electrode on the lower forehead
- A reference electrode on the clavicular joint
It’s important that the electrodes on the SCM muscles are symmetric and that you place them on the top third of the SCM muscle (Figure 3). If you place them too low, you risk finding a null point where you're not going to record the response from that muscle.
When placing the electrodes, try to press on the adhesive white region around the outside of the electrode. The conductive gel sits in the middle of the electrode, and you don't want to press too much on that area because it might disperse the gel, and also reduce the adhesive. But if you don't have great impedances, you can lightly press in the middle of the electrode to move the gel a bit more and improve the impedances. It is best to avoid pressing too hard on the electrode, as this can be unpleasant for your patient.
When checking your impedances, make sure they’re low (less than or equal to five kiloohms) and balanced across the montage before testing.
cVEMP protocol and parameter selection
Using the Eclipse software, we can look at our cervical VEMP protocol and parameters.
1. Stimulus type
The cVEMP protocol defaults to using a tone burst stimulus, but a recent paper published in 2023 [1] compared different stimulus types and found that the narrowband CE-Chirp stimulus family provided larger response amplitudes. So, you could consider going with the narrowband CE-Chirp.
2. Transducer type
Make sure that the transducer you’re using matches what you have selected in the settings. For air conduction, this can be either inserts or headphones.
3. EMG-controlled stimulus recording
If you select this, then the stimulus will only be presented, and the Eclipse will only record, when the patient's EMG contraction is within the range that you have set in the EMG window. This does have the advantage of not presenting the stimulus when the SCM is not at the appropriate EMG level to successfully measure the response.
4. EMG monitor
The patient's EMG monitor option provides an extra visual indication of whether the patient has achieved the appropriate EMG contraction (see Figure 1 above). This is displayed as a visual bar on the screen, and you can set the range of this for each patient if required.
5. EMG scaling
EMG scaling is a further option. The Eclipse system measures the level of EMG (muscle activity) for each VEMP recording. This measurement can then be used to ‘normalize’ each VEMP measurement relative to the EMG and allow more accurate comparisons for asymmetry. Some clinicians prefer to leave EMG scaling turned off, allowing them to visualize the raw recordings first, and then apply the EMG scaling afterwards.
6. EMG monitor tone
This is a sound that is delivered for the patient to listen to – in the same way as the EMG monitor bar – but this provides an auditory indication on whether they are providing enough muscle contraction during the cVEMP recording.
cVEMP: Running the test
Once you’ve set up your protocol and applied the transducers being used, you’re ready to start the test. Watch the video below to see a real-life application of performing cVEMP.
cVEMP modifications
We've seen what is thought of as a traditional cVEMP recording, but there are a couple of possible modifications that can be used to successfully record cVEMP; we’ll discuss these below.
1. Type of stimulation
As discussed previously, if you have any middle ear pathology or presence of wax in the ear canal, then using a stimulus which is delivered by air conduction may not be the best type of stimulation to use for your VEMP. As an alternative, you could use the B81 bone conductor to deliver the stimulation via the skull to the otolith organs.
2. Patient position
The second modification is where you have your patient in a slightly different position to record the cVEMP compared to the upright seated position in Figure 1. In the upright seated position, some people may have some rotational neck restrictions and cannot produce enough muscle contraction of the SCM to allow a high enough level of EMG activity to record a robust response. If this is the case, then an alternative is to have the patient lying down on a bed instead.
In this position, ask the patient to lift their head upwards and then turn to the side. Typically, this will produce a much stronger muscle contraction with less head/neck rotation. This can be a more challenging task for the patient to do because they need to maintain this lifted position. So, it’s important that you check your patient’s history for any significant neck or musculoskeletal issues, which might make this a contraindication to testing using this method.
Ocular VEMP (oVEMP)
Ocular VEMPs record the function of the utricular system, and the superior vestibular nerve pathway. If you conduct both VEMP measurements, you're actually looking at the otolith system in two different ways, assessing both the utricular system (oVEMP) and the saccular system (cVEMP).
In the following, we’ll dive deeper into preparing for and performing oVEMP testing.
oVEMP pathway
For oVEMPs, the reflex pathway is (Figure 4):
- Utricular otolith system
- Superior vestibular nerve
- Vestibular nucleus
- Medial longitudinal fasciculus
- Oculomotor muscle nerve pathway
- Inferior oblique muscle of the eye
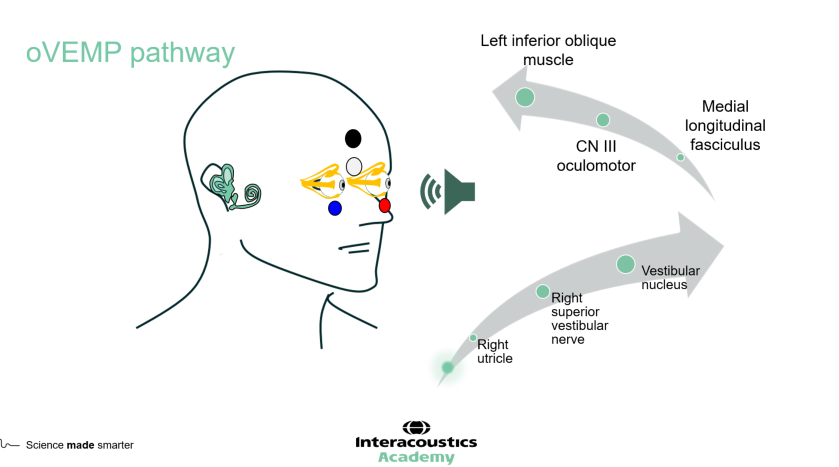
The inferior oblique muscle of the eye – a very small muscle – is the muscle where you measure the actual oVEMP response. Ocular VEMPs are crossed responses, meaning if you stimulate the right ear, you need to measure the response underneath the left eye.
oVEMP patient preparation
There are several preparation steps you need to perform before placing the electrodes on your patient and performing the test.
1. Preparatory tests
It’s a good idea to perform a few preparatory tests, as the results can guide you in terms of what type of stimulation to use for VEMP testing. Suggestions include:
- Video otoscopy
- Pure tone audiometry
- Wideband tympanometry
2. Type of stimulation
You can use air conduction (insert earphones or supra-aural headphones) or bone conduction (B81). If your tympanometry results look normal, we recommend using air conduction. As discussed previously, if you have any middle ear pathology or presence of wax in the ear canal, then using a stimulus which is delivered by air conduction may not be the best type of stimulation to use for your VEMP. As an alternative, you could use the B81 bone conductor to deliver the stimulation via the skull to the otolith organs.
3. Skin preparation
To ensure good contact between the electrodes, the skin and to achieve low impedances, we recommend using gauze or cotton wool with some mild abrasive paste to clean the skin. You don't need to scrub too hard, as the purpose is to remove any:
- Oils
- Makeup
- Moisturizer
- Dead skin cells
A good tip is to flip the gauze or cotton wool to wipe off any excess abrasive paste, so you have a dry surface to place and attach the surface electrode to.
oVEMP electrode montage
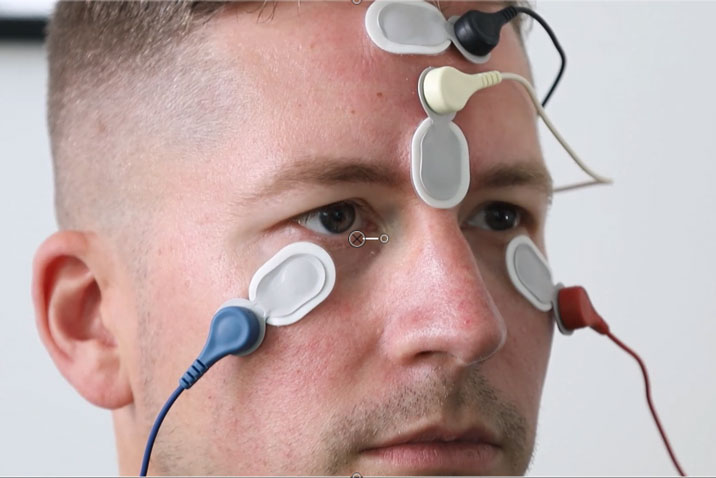
For oVEMPs, given they are a crossed response, the electrode montage is:
- Left electrode below right eye
- Right electrode below left eye
- A ground on the high forehead
- A reference at the top of the bridge of the nose
You can see an example of the correct oVEMP electrode montage in Figure 5. When placing the electrodes under the eyes, keep in mind you’re dealing with delicate skin, and be mindful of the eyelashes as well. When checking your impedances, make sure they’re low and balanced before testing.
oVEMP protocol and parameter selection
Within the Eclipse software, we can take a look at the settings in our oVEMP protocol and parameters.
1. Stimulus type
The oVEMP protocol defaults to using an air conducted tone burst stimulus, but a recent paper published in 2023 [1] compared different stimulus types and found that the narrowband CE-Chirp stimulus family provided larger response amplitudes. So, you could consider going with the narrowband CE-Chirp.
2. Transducer type
Make sure that the transducer you are going to use to measure the VEMP matches what you have selected in the settings. For an air conducted stimulus, this can be either inserts or headphones.
3. Number of stimuli
Another setting to look at is the number of stimuli that we can record in one epoch (measurement). For oVEMP testing, you would usually set this at a higher number than for cVEMP, because sometimes you may have a bit more noise in the smaller ocular VEMP measurements, meaning you might want to run a longer test with more measurements collected. Setting the number of stimuli at a higher number allows you to carry on recording for as long as you need to be confident in a response that is present or absent.
4. EMG options
As described above for the cVEMP protocol, there are settings for EMG-controlled stimulus recordings, monitors, and scaling. As the measurement is taken from the inferior oblique muscle, which is much smaller in oVEMP, the muscle EMG generated is also much smaller. Also, the oVEMP is not an EMG-controlled amplitude response such as the cVEMP, so you don't need to use any of these particular settings in this oVEMP protocol.
oVEMP: Running the test
Once you’ve set up your protocol and applied your transducers, you’re ready to start the test. Watch the video below to see a real-life application of performing oVEMP.
oVEMP modifications
So, we've seen a traditional oVEMP recording, but there are a couple of possible modifications that can be used to help record successful oVEMP responses; we’ll discuss these in more detail below.
1. Type of stimulation
As discussed previously, if you have any middle ear pathology or presence of wax in the ear canal, then using a stimulus which is delivered by air conduction may not be the best type of stimulation to use for your VEMP. As an alternative, you could use the B81 bone conductor to deliver the stimulation via the skull to the otolith organs.
2. Fatiguing eye position
As we demonstrated in the video above, the textbook gaze position is at 30 degrees vertically, but this can be very fatiguing for some patients. A modification during testing would be to ask your patient to bring their head forward and down, tilting their chin to their chest, and to gaze straight ahead. This will bring your patient’s eyes in the upper part of the orbit and align the inferior oblique muscle for the oVEMP test.
Summary
VEMPs are a very useful addition to the vestibular test battery if you want to measure otolith function. Conditions and pathology that can affect semicircular canal function in the peripheral vestibular system can also affect the function of the otolith organs.
A comprehensive assessment of peripheral vestibular function would benefit from the inclusion of the VEMP assessment, as human balance and stability uses these gravity- and linear-acceleration detectors during activities of daily living.
Although VEMP assessment does require a skillset and equipment that deviates a little from other vestibular tests and vestibular testing equipment that you might be familiar with, following this guide should allow you to gain confidence in the routine performance of the assessment.
Related courses
References
[1] Reddy, T. M., Heinze, B., Biagio-de Jager, L., & Maes, L. (2023). Cervical and ocular vestibular evoked myogenic potential: A comparison of narrowband chirp, broadband chirp, tone burst and click stimulation. International journal of audiology, 62(6), 579–586.
Presenter
