
Real-ear measurements: A step-by-step guide
Description
Table of contents
- What are real-ear measurements?
- Why perform real-ear measurements?
- Contraindications to performing real-ear measurements
- How to perform real-ear measurements
- Important steps after the real-ear measurement process
- An important note on counseling
What are real-ear measurements?
Real-ear measurements, also referred to as real-ear verification or hearing aid verification, are an objective measure of what a hearing aid is doing inside the ear canal. A thin probe microphone is placed within 5 mm of the ear drum and a sound stimulus is delivered to the ear via a loudspeaker. Real-ear measurements help to understand the sound pressure level (SPL) provided by the hearing aid and the amplification effect of the ear canal.
Why perform real-ear measurements?
In simple terms, the reason for doing verification and real-ear measurements is to confirm that the hearing aid is performing in a certain manner to provide maximum benefit. This is usually to confirm that the hearing aid is matching the prescription target chosen in the hearing aid manufacturer’s software. You should consider verification alongside validation.
These measurements are essential to perform because the anatomy of the ear canal is unique to each person, which will impact the sound delivered to the ear canal. Real-ear measurements are the only way you can measure – and account for – these effects in the hearing aid programming.
Other reasons to perform real-ear measurements include measuring the effect of directional microphones and verifying advanced hearing aid features such as frequency‑lowering technology.
Before we continue to explore hearing aid verification, it’s important to consider hearing aid validation and why the manufacturer’s first fit isn’t good enough.
What is hearing aid validation?
Hearing aid validation is complementary to real-ear measurements and ensures the hearing aid is fulfilling the needs of the client in the real world. It’s an important step of the hearing aid journey and sits alongside hearing aid verification.
Forms of hearing aid validation include questionnaires and subjective and functional assessments of hearing, such as an aided hearing test. Validation requires the client to have experience with wearing the hearing aid, so these measurements are collected after the first hearing aid fitting.
Why the manufacturer’s first fit isn’t good enough
The alternative to doing real-ear measurements is to use the manufacturer’s first fit. Valente et al. (2018) looked at how well first fits will match to target [1]. They compared this against using real-ear measurements, referred to as a programmed fitting in the paper. This was assessed at 50-, 65-, and 80-dB input levels.
Let’s look at the 65 dB input level first (Figure 1).
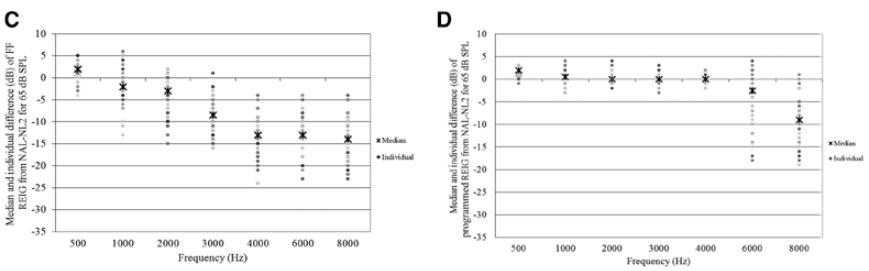
The scatterplots in Figure 1 show how well the hearing aid was able to achieve a match to target. That is, at each individual frequency, how far away was the true response of the hearing aid when compared to the prescription target for that frequency? A value of 0 dB is a perfect match to fit.
Graph C is the manufacturer’s first fit. The median results deviate significantly from target as you go toward the higher frequencies. On that graph, you can also see the small circles which are the individual measurements.
So not only does the manufacturer’s first fit lead to a poor match to target, but there’s vast dispersion across the different clients that were measured. So it would be difficult to predict the deviation from target with the manufacturer’s first fit.
In contrast, the median results of graph D were much closer to 0. Thus, a programmed – or real-ear measurement – fitting gives a much closer match to target. The individual dispersions are also much lower in the low and mid frequencies. This shows the need to measure the characteristics of the ear canal to achieve an accurate match to target.
This paper also looked at the outcome of the clients’ speech discrimination following hearing aid fitting (Figure 2). It compared those who were fitted to the manufacturer’s first fit with those fitted using real-ear measurements – written as ‘programmed’ on the figure.
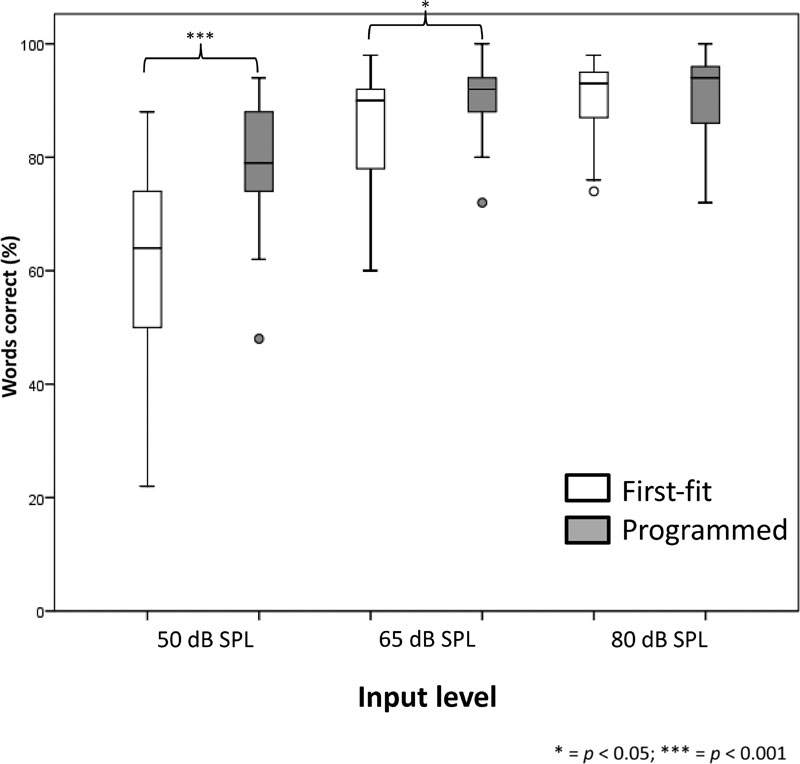
The whisker box plots in Figure 2 show the word scores for individual input levels when averaged across the first-fit and real-ear-measurement fittings.
At the 50 dB input level, which is a quiet speech level, there’s a significant improvement in the word score for the clients fitted with real-ear measurements compared to those fitted to the manufacturer’s first fit. The significant difference is also seen at the 65 dB input level.
So for quiet and normal speech levels, there’s a much better word score when fitted with real-ear measurements. These are the input levels which those with hearing loss struggle with most.
So we know that fittings are closer to match to target and that the speech outcomes are better. But what does the client prefer? According to Valente et al. (2018), clients preferred real-ear measurements 79% of the time, whereas clients preferred the first fitting – or the manufacturer’s first fit – only 21% of the time.
Contraindications to performing real-ear measurements
Real-ear measurements are well tolerated in almost all older children and adults. Contraindications to performing the measurement are usually associated with abnormalities of the ear canal. These include:
- Excessive ear wax
- Discharge from the ear canal
- Significant pain in the ear canal
- Perforations (although real-ear measurements can be useful in this population)
1. Excessive ear wax
If there’s so much wax that you cannot safely observe the ear drum, or it occludes the end of the probe tube, then this is too much wax. If there’s wax present, then the low-frequency response of the hearing aid can be affected by wax filling up a significant amount of the ear canal. This could be seen if measuring a residual volume of the ear canal in tympanometry. For the high frequencies, these would be affected by ear wax occupying more than one third of the cross-sectional area of any part of the ear canal (Dillon, 2001).
Note: There is no empirical data on this issue.
2. Discharge or significant pain
This could be caused by an infection in the ear canal.
3. Perforations
A perforation might make it dangerous to insert the probe tube as you don’t want to enter into the middle ear space. A perforation can also be so large that any measurements would be significantly affected by the middle ear space.
How to perform real-ear measurements
Figure 3 demonstrates how the real-ear measurement works and the equipment that’s needed.
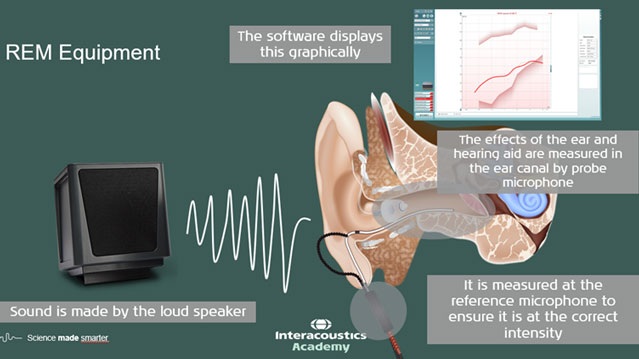
The probe and hearing aid are placed into the ear canals. After this, a speaker plays a stimulus, which is measured by a reference microphone which sits outside of the ear canal. This ensures that the sound is at the correct intensity once it reaches the ear.
The effect of the ear and the hearing aid are measured by the ear canal probe microphone. The software will then display the frequency response measured in the ear canal alongside the prescription target programmed in the hearing aid. This informs if you need to adjust the gain or response of the hearing aid.
This is a simplified description of the process and there are a few extra steps that lead to good quality, real‑ear measurements. Let’s discuss these now.
1. Make sure your testing room is set up correctly
First of all, you need to make sure that your room is set up correctly (Figure 4).
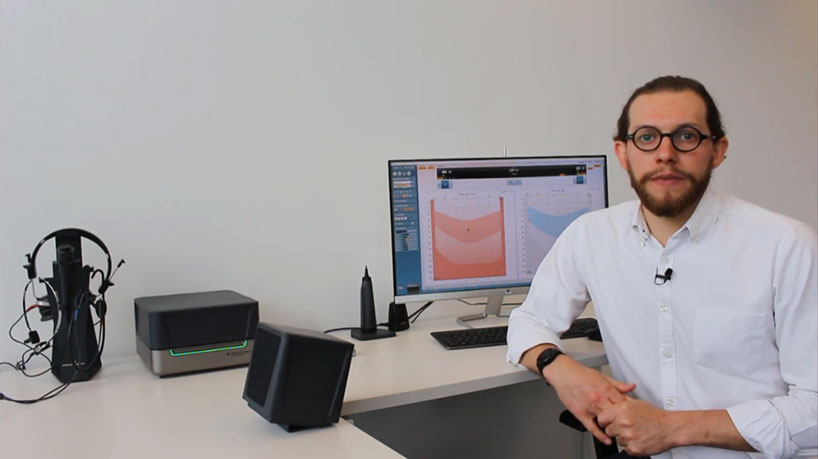
As you can see, the loudspeaker is positioned far (1 meter) away from any reflective surfaces, and the client will be sitting in front of it. This is important for measuring accurate responses.
You also need to make sure the room has low ambient noise, meaning it’s nice and quiet. The Affinity Compact has an Ambient Noise microphone which can help to track and measure the noise in the room to make sure it’s at a suitable level.
2. Review your client’s audiogram
Next, it’s important to review your client’s audiogram. This information is important to factor into your hearing aid fitting, such as:
- What type of hearing loss does your client have?
- Did you record any uncomfortable loudness levels?
- For dB HL to dB SPL conversion, which transducers were used to measure the audiogram?
Once you’ve familiarized yourself with all that information, you can then move into the real-ear measurement screen.
3. Choose the correct target
On launching the real-ear measurement module of your software and selecting your test protocol, you’ll be prompted to select the fitting prescription. There’s a lot of choice surrounding the fitting prescription, but we recommend choosing the NAL or DSL algorithms as these are both evidence‑based targets which give a good starting point to base your fitting around.
Once you’ve chosen the prescriptive target, you’ll be required to select some more information to further personalize the prescription to the client. This information includes if the fitting is binaural or monaural and if the hearing aid needs to consider an air-bone gap.
4. Probe tube calibration
Before putting the probe inside the ear, it’s essential to perform a probe tube calibration. You can perform this step without the client being present. It involves aligning the external microphone with the probe microphone to compensate for the frequency response of the probe tube. A stimulus is played, and a trace will appear on screen like Figure 5.
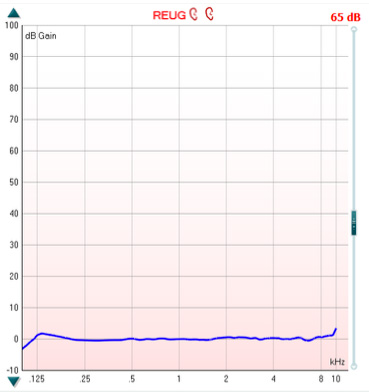
You can check the calibration in the upcoming REUG measurement by running a measurement at 65 dB SPL. If the device is properly calibrated, then it should produce a flat trace with a gain value of 0 dB, as shown in Figure 6.
5. Probe tube placement
Your probe tube is your measurement reference point for your fitting and correct placement ensures quality measurements. You should follow these steps to ensure a good probe tube placement:
- Good otoscopy to ensure you know the shape of the client’s ear canal and observe for any obstacles like wax. You can also perform otoscopy once you’ve inserted the tube to get a better placement after readjustment.
- Move your marker on your probe tube to 28 or 30 millimeters depending on your client’s gender. This ensures that you aren’t over-inserting the probe into your client’s ear.
- Once you’ve placed the probe, observe your REUG to assess your probe placement quality. If you’re not within 5 dB of the 0 dB mark at 6 kilohertz, reassess your probe tube placement.
For Affinity Compact users, an alternative method is to use the Probe Placement Indicator, where an auditory stimulus will enable the software to tell you when the probe is in the correct position and when you can stop.
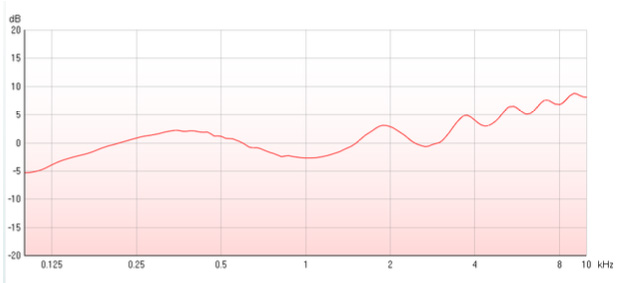
6. Real-ear unaided gain (REUG)
Your REUG measurement allows you to measure the effects of the unamplified ear. This measurement is useful for assessing probe tube placement. Figure 7 shows the characteristic response you want to see.

As you can see, there’s 0 dB of gain in the low and mid frequencies, rising to a peak at around 2.5 kHz, and then dropping back down to around zero dB in the high frequencies. If you see a negative response at 6 kHz above minus 5 dB, then it’s recommended to insert the probe tube deeper into the ear canal, closer to the ear drum.
7. Real-ear occluded gain (REOG)
The REOG is a measure of the occluded ear. To do this, first insert the hearing aid into your client’s ear and mute it or turn it off. Then run your measurement and compare it against the REUG measurement.
If it looks the same or similar, then this informs you that the acoustics of the hearing aid are having a minimal effect in the ear canal. This is an open fitting. When you see this, you’ll need to perform the calibrate for open fit measurement.
If there’s a large difference between the REUG and REOG, then this informs you that the fitting is more closed. In other words, you’re blocking the ear canal with the instrument.
Depending on what your client needs, you can use this information to either confirm that the acoustic choice – or venting chosen – for the hearing aid is correct.
8. Calibrate for open fit (optional)
The calibrate for open fit measurement performs a process to ensure accuracy when fitting hearing aids which have the potential for leak out of the ear canal. These are typically open-fit domes or ear molds with large vents.
To perform the measurement, leave your hearing aid muted and run the calibrate for open fit measurement with the client placed in the position they’ll be in for the rest of the measurements. This will then switch the reference microphone off. Because of this, it’s important that your client remains still for the rest of the hearing aid fitting.
You should do this process for each stimulus you wish to use for your aided measurements.
9. Real-ear aided response (REAR) measurements
You can now switch on the hearing aid and begin to verify the fitting of the hearing aid. It’s advised to run three different stimuli levels: 65, 50 and 80 dB. This ensures that you’re assessing the hearing aid at different levels of intensity. On running the different stimuli, you should alter the gain trimmers in your hearing aid software to ensure target match.
You can use the Delta Values feature in the Affinity Suite to assess if the hearing aid is matching the target correctly or if you need to make more adjustments. Once you’ve achieved a good target match at all three levels, you’ve completed the objective aspect of the fitting.
Important steps after the real-ear measurement process
It may be tempting to think that the real-ear measurement process and the hearing aid fitting finishes here with a hearing aid that is matched to target perfectly. But the fitting appointment is not finished at this stage. You still have a few more stages and steps to perform:
- Fine-tuning adjustments
- Make sure your client knows how to use their hearing aids
- Arrange a follow up and the next steps
1. Fine-tuning adjustments
Depending on where your client is in their rehabilitation, they may not be satisfied with – or have some comments on – the way that the hearing aids sound. Here are some common comments that you may get:
- The sound is sharp or harsh
- Complaints about the client’s own voice
- The sound is generally too loud or echoing
The temptation with these is to turn the hearing aid down to end any of the complaints or the comments, and then turn it up later on in the hearing aid fitting journey.
However, there are tools that you can use to ensure the frequency shaping of the fitting is maintained. Some hearing aid manufacturer software will allow you to adapt what’s called an adaptation manager or similar. This is where the higher frequency components of the hearing aid response are turned down. And there are certain levels that you can set this to.
You can also make sure the hearing aid automatically turns up over time as the client’s been wearing it, ensuring that they automatically return to that perfect fitting, but helping them get used to the new sounds over a longer period of time.
2. Make sure your client knows how to use their hearing aids
When your client walks out of your clinic, they should know how to:
- Use the audible indicators
- Charge or change the batteries
- Insert their hearing aids correctly
- Clean and maintain their hearing aids
- Connect their hearing aids to other devices
- Use the controls and buttons on the hearing aids
3. Arrange a follow up and the next steps
The final stage is to arrange a follow up and the next steps with your client’s rehabilitation. Hearing aid fittings do not finish at the first fitting appointment. You may arrange telephone follow ups or remote care appointments with your client. Or you may choose to bring them back into your clinic. You should arrange these things with your client based on both your clinic’s and your client’s needs.
An important note on counseling
Counseling is essential throughout the entire fitting process and includes, but is not limited to:
- Teaching your client about their hearing loss
- Including your client’s communication partners
- Referring your client back to any questionnaires
- Speaking about your client’s motivation for wearing hearing aids
- Aligning your client’s expectations with the actual benefit of their hearing aids
Related course
Getting started: Real ear measurements
References
[1] Valente M, Oeding K, Brockmeyer A, Smith S, Kallogjeri D. Differences in Word and Phoneme Recognition in Quiet, Sentence Recognition in Noise, and Subjective Outcomes between Manufacturer First-Fit and Hearing Aids Programmed to NAL-NL2 Using Real-Ear Measures. J Am Acad Audiol. 2018 Sep;29(8):706-721. doi: 10.3766/jaaa.17005. PMID: 30222541.
[2] Dillon, H. (2001). Hearing aids. Thieme.
Presenter
