
How to Improve Evoked Potential Recordings
Preparing the skin
Always use an abrasive preparation gel (e.g., NuPrep) to ensure that the top layer of skin (epidermis) is cleaned and oil is removed. The skin may become a little red after an appropriate preparation, and you should aim to get impedances below 3kOhm.
Note: Be careful not to damage the skin.
Neonates
Some clinicians use only alcohol wipes/pads to remove vernix prior to ABR recording on neonates (age 0-3 months). A disinfectant agent such as alcohol can also be used for preparing the skin of neonates.
Preparation instructions
Remove any oil/lotion/vernix from the contact point on patient’s head. Wipe all preparation gel off with an alcohol wipe/pad or a soft dry non-stick cloth (e.g., gauze).
-
- For sensitive/allergic skin, it may be best to use only a soft dry cloth since alcohol can dry out the skin. If the patient suffers from any known allergies e.g., perfume, pay extra attention to the use of disinfectant agents
- Since alcohol may take time to dry, impedances may be slightly higher when using alcohol. Make sure that the alcohol is completely dry before applying conductive gel and electrodes
- Some clinicians prefer not to use alcohol pads/disinfectant agents, but remove the preparation gel with a dry non-stick cloth (e.g., gauze)
- If the patient’s skin is dry or you are obtaining high impedances, apply a small amount of conductive gel/paste to the skin prior to connecting the surface electrode. This will help to rehydrate the skin and to lower impedances
Mounting the electrodes
Always prepare the skin prior to mounting either disposable or reusable electrodes.
Some disposable electrodes are pre-gelled (e.g., PEG15), and no further gel is required.
Note: When mounting pre-gelled disposable electrodes (e.g., PEG15), do not press in the middle of the electrode as gel to be dispersed to the adhesive outer edge causing the electrode to loosen from the skin, causing very high impedances during testing.
- Mount the disposable electrode by pressing down around the adhesive outer edge
- If you gently pull on the electrode a few seconds after application, the electrode should remain tightly adhered to the skin. This should ensure very low impedances (≤ 1kOhm)
- Recommended impedance are below or equal to 3kOhms and balanced (e.g., all electrodes should have similar impedance values within 2kOhms)
-
Reusable electrodes are expected to have higher impedance than the disposable electrodes.
- For reusable electrodes, it should be possible to achieve impedances in the range of 1-5kOhms
- Always apply a conductive electrode gel/paste (e.g., 10-20 paste) to all reusable electrodes before mounting
- Use medical tape (e.g., micropore) to hold the reusable electrode cups in place on the skin. Lead is sometimes soldered onto the reusable cup electrodes by a hospital to improve their conductivity; producing lower impedances. Reusable electrodes containing lead are not supplied, because of thehazardous nature of lead.
How to reduce noise
1. Test room parameters
The test room and location of the room can greatly effect ABR recordings.
The following test room parameters should be aimed for:
- A magnetically shielded booth/room (if possible)
- A quiet or soundproofed booth or sound treated room. This ensures the patient can relax without disturbances and the stimulus noise is not masked by background noise
- Use of a dedicated ground (isolated socket) for the ABR equipment
- Lights and other equipment not being used should be turned off or unplugged as the patient can work as an antenna and picks up electrical interference from these sources
- Separate equipment cables to reduce interference (e.g., braid electrode cables, keep electrode cables and transducer cables away from each other)
- In some cases, it may be necessary to find another test location if there is too much ambient or electrical noise in the current test room.
- Try moving the test bed within the room. It may be placed unknowingly, adjacent to a wall that has hidden cables and electrical sources.
2. Patient instructions
The quality of the ABR recordings depends highly on the state of the patient. If the patient is not physically/mentally relaxed, more unstable, noisy recordings will be seen.
Instruct the patient so that:
- They are relaxed and calm.
- Their eyes are closed and that their face and jaw muscles are relaxed.
- They are lying down on a comfortable bed or reclining in a comfortable chair. The duration of an ABR test can be long, so ensure that the patient is as comfortable as possible (use pillows and blankets as needed). An upright sitting position should be avoided due to contracted neck/head muscles.
- Turn off lights in the test room to avoid electrical interference and to help the patient to relax/go to sleep. Sleeping during recording will provide the lowest noise from the patient, so a sleeping state ispreferred if possible.
- Test infants and children during sleep is recommended as they cannot be instructed to or find it difficult to relax for the entire test duration.
- It is important to try and use the same test conditions and parameters for each test when comparing results.
3. Set an appropriate rejection level
A recording cannot be collected if the system rejects the signal.
- Adjust the rejection level to an appropriate level according to the patient and test type. Typically, ABR recordings can be made using a rejection level of 40µV or less when the patient is relaxed and/or sleeping.
- A lower rejection level means a lower amount of noise is recorded during each average. This equates to faster and more accurate recordings.
Changing the rejection level
The rejection level should be increased until the real time EEG signal (top of the screen) is no longer red (indicating rejection). The rejection level used will depend on the patient and the electrical interference in the test room. A black EEG curve indicates that the system is ready to measure.

The higher the rejection level value, the more noise is recorded during each average. Therefore, always use the lowest possible rejection level value, without rejection. The level can be adjusted during a recording, by double clicking on the EEG window (EP15/25 only) and adjusting the input level by dragging the horizontal bars.
If a high rejection setting is needed, check that electrode impedances are sufficiently low and that the patient is relaxed before starting the test. Muscle tension of the face, back or neck due an uncomfortable or incorrect position will disturb the ABR recordings as these muscles are close to the recording site.
4. Grounding
Grounding is crucial for good ABR waves and safe operation. A separate ground dedicated for the ABR equipment should be used. A true ground uses a minimum of three earth rods.
The Eclipse’s power cord contains a ground lead (typically indicated by yellow and green colors), but often the ground at the test site may not be sufficient.
- Always check the wall outlet for a proper ground when establishing an ABR test room. Sometimes the ground lead is found inside the wall outlet but is not connected to the ground. In these cases where the ground is not connected or even missing, the ABR recordings will be dramatically distorted.
- Electrical interference may appear through the ground lead if the wall outlet used is connected to a shared ground (e.g., other wall outlets with electrical equipment connected share the ground). In this case, a dedicated ground wall outlet for the ABR recording equipment should be established.
- The ABR system cabinet is connected to the ground lead via an internal capacitor. If the ground lead is not connected, the ABR system will pick up electrical noise/interference. This will be seen on the screen as very large harmonic distortion curves completely overlaying/destroying the ABR curves.
- Ground the patient bed if it is made of metal. On the backside of the Eclipse, there is a special ground plug which can be connected to the patient bed.
Check the ground for proper and correct function
NOTICE
Due to High Voltage, only experienced technicians/ properly trained staff must check and change the ground.
To check and verify the ground, various methods can be used.
- A dedicated ground tester.
- A voltage/impedance comparison from the wall outlet ground lead to a triangle of earth rods.
- Ground should have max 8ohm, and 0.5V deviation compared to the true ground.
- A more simple check is to use a Voltage Meter and measure directly from the wall outlet. Please verify these specifications:
- The Voltage between Phase (Hot) socket and Zero (Neutral) socket must be a stable 230V for Europe /110V for US (country specific).
- Check the Voltage between phase (Hot) socket and Ground socket, 230V for Europe / 110V for US (country specific). The voltage value found in step a, should match the voltage value found in this step (within 5V). If the recorded voltage is much less than the expected voltage (e.g., a voltage reading of 50V for US), the ground is not connected to a true ground, even though you may be able to see the lead in the wall.
- Check the Voltage between Zero (Neutral) and Ground. It must be 0V. If the recorded voltage is much less than the expected voltage, the ground is not connected to a true ground, even though you may be able to see the lead in the wall
How to reduce noise in the EP15/25 module
1. Optimizing settings
Changing the filter settings can reduce excessive environmental electrical interference.
With the EP software, go to File - System setup – Auto Protocols tab.
For 15ms tests (ABR-15), change the high pass filter to “100Hz 12/oct”

Note Using a filter setting like this may reduce the amplitude in the ABR waveforms. However it may be needed if it is impossible to obtain ABR curves without excessive electrical interference.
Change the stimulus rate so that it isn’t time locked to other electrical interference (e.g., 50/60Hz mains) can reduce noise.
![]()
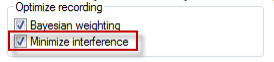
For periodic interferences, use the Minimize Interference option. Small random pauses are inserted between stimulus presentations, minimizing the synchronization with electrical interference. These pauses do not influence latency times or in any other manner, change the behavior of ABRs.
Please refer to the Eclipse Additional Information for more information
2. Use insert headphones
The recording below was carried out using reusable electrodes and headphones. Note the very large spikes before 1ms, especially on the curves at high intensities.

This is an electrical artifact caused by electrical coupling from the headphones to the input circuit when high sound stimuli intensities are used.
To solve this:
-
- Always use insert earphones
- If using head phones they must be shielded. A shielded headset will still produce a small artefact using intensities above 90 dB SPL
- Start the recording window after the artifact