
Virtualis troubleshooting for clinicians
This quick guide provides solutions to common issues you may encounter with your Virtualis solution. If problems persist after trying the troubleshooting steps, please reach out to your tech support representative for further assistance.
This quick guide will cover basic troubleshooting for the:
VR headset
Below, we will cover troubleshooting for the following:
- Unstable tracking
- VR headset loses WiFi signal
- Not prompted to reset room boundary or the room boundary grid lines appear
- Passthrough mode is activated
- Blurry vision
- Slanted view in VR headset
- Menus appearing inside the VR headset
Unstable tracking
Reason: Insufficient lighting or shiny surfaces. Check frame rate by pressing the F button on the keyboard. This should be at or above 90 fps. If it is not, continue below.
1. Solution: Improve lighting inside the room.
2. Solution: Remove reflective surfaces (mirrors, windows) that could interfere with tracking.
3. Solution: Check WiFi router placement:
- The maximum distance between the WiFi router and the VR headset should be less than 3 meters / 9 feet.
VR headset loses WiFi signal
Reason: WiFi signal lost. Solution: re-pair VR headset and WiFi router.
1. First, ensure the VIVE Business Streaming application is open on the computer.
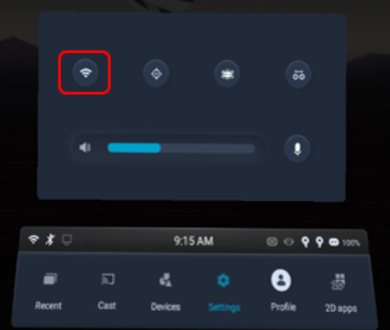
2. Next, ensure Wi-Fi is connected to VirtualisVR_5G on the computer and VR headset:
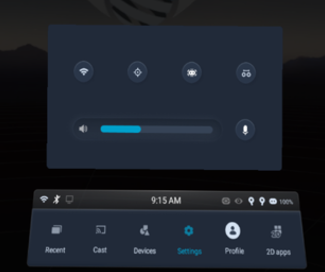
- Put the VR headset on.
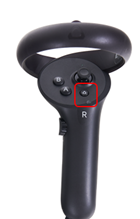
- Press the VIVE button on the right-hand controller to enter the menu.
- Using the controller, select Settings > Wi-Fi.
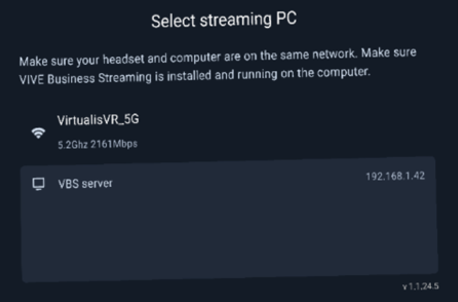
- Inside the VR headset, you will see “VBS server” appear. Using the controller, select this option.
Not prompted to reset room boundary or the room boundary grid lines appear
Reason: Room boundary calibration incorrect. Solution: Reconfigure the room boundary.
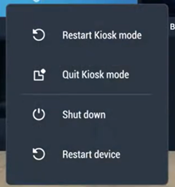
1. First, you need to exit Kiosk Mode. Press and hold the button on the left side of the headset for approximately 3 seconds until a pop-up menu appears inside the VR headset.

2. Using a controller, select Quit Kiosk mode.
3. Enter the passcode: 0000.
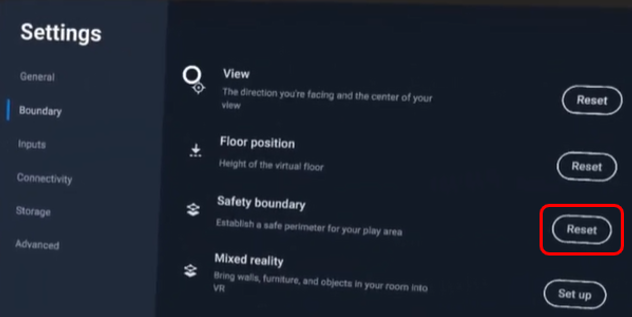
4. Click on Settings > Boundary > Floor position > Reset.
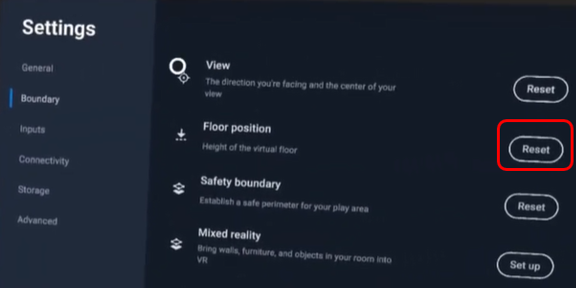
5. Check that the automatically detected floor is at the correct height. It is marked with blue symbols. If it is not, lower yourself and place a controller in contact with the floor to set the floor position correctly.
6. When finished, press the “Done” button.
7. Next you will need to reconfigure the room boundary. Using one controller, navigate to safety boundary and select “Reset.”
8. Using a controller, draw the contours of the room by following the bottom of the walls of the room where you are setting up the Virtualis solution. Avoid obstacles present in the room. The outline must be drawn in a single continuous line, and the two ends must meet.
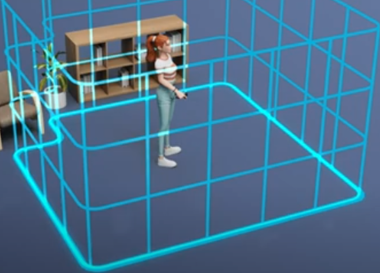
9. Once completed, a confirmation pop-up will appear. Press “Done.”
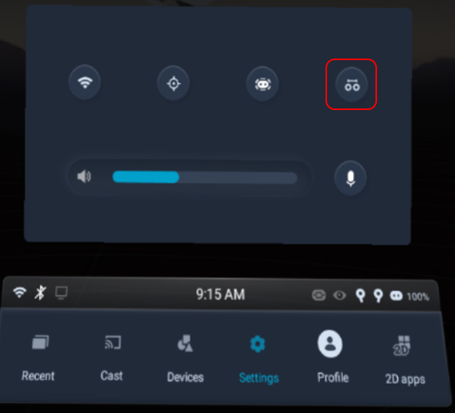
10. You will then need to re-enter Kiosk Mode. Using one controller click Kiosk Mode > Enter Kiosk mode.
Passthrough mode is activated
Reasons:
1. The patient double clicked the VIVE button on the right controller.
2. The patient moved outside the room boundary.
Solutions:
1. Have the patient double click the VIVE button on the right controller. They will re-enter the Virtualis application inside the VR headset.
2. Reconfigure the room boundary by following the directions above under “Not prompted to reset room boundary”.
Blurry vision
Reason: Poor fit of the VR headset or IPD adjustment is not correct. Solution: Instruct your patient to move the VR headset up and down on their face until they find a clear vision. Then tighten the headset dial and adjust the top headset strap. Complete a manual IPD adjustment following the below directions:
1. Press the VIVE button on the right-hand controller.
2. Using the controller, select Settings IPD adjustment. Follow prompts on the screen.
3. Press the VIVE button on the right hand controller to exit the menu.
Slanted display in the VR headset
Reason: Bad headset calibration (centering, balancing). Solution: Restart VR headset.
1. With the VR headset on, place the VR headset on the ground.
2. Turn off the VR headset by pressing and holding the button on the back of the headset for 10 seconds.

3. With the VR headset still on the ground, turn the VR headset on by pressing and holding the button on the back of the headset for 3 seconds. Do not touch the VR headset for 1 minute.
Menus appearing inside the VR headset
Reason: button pressed on one of the controllers or left side of the VR headset.
Solutions:
1. Headset menu appears:
Press the button on the left side of the menu to close the headset menu.
2. VIVE menu appears:
Press the VIVE button on the right-hand controller one time.
3. VIVE streaming settings menu:
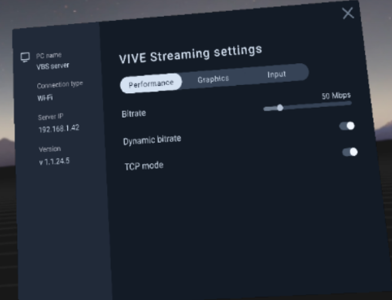
Double click the hamburger button on the left-hand controller.
Controllers and trackers
Below, we will cover troubleshooting for the following:
- Drifting tracker
- Tracker not detected
- Xbox controller not detected
Drifting tracker
Reason: poor connection between VR headset and tracker. Solution: restore tracking.
- Ensure the tracker is turned on. Place the VR headset on your head and move to the center of your boundary. Hold one tracker in front of your chest with the cameras facing out. You will see a number in a blue bubble appear on top of the tracker. Repeat with the other tracker if needed. Your trackers are now paired and ready.

Tracker not detected
Reason 1: The tracker is not on. Solution: Turn your tracker on.
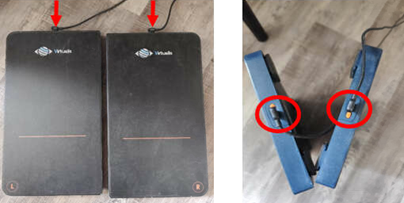
- There should be a solid green light on the top of the tracker. If there is no light, press and hold the top button to turn the tracker on. If the light turns solid green, your tracker is paired. If the light is flashing red, it signals low battery. You need to charge your trackers before using them.
Reason 2: Connection lost with the VR headset. Solution: Re-pair the tracker.
1. Check that the VIVE dongle is in the VR headset.
2. Put on the VR headset.
3. Press the VIVE button on the right-hand controller one time.
4. Using the controller, select Settings > Devices > Motion trackers > Settings in the upper right corner.
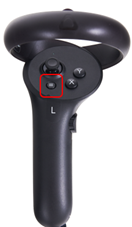
5. Select the “x” on the controller you want to unpair.
![]()
6. Press and hold the tracker button until the LED blue light flases to repair
Xbox controller not detected
Reason 1: The controller is not on, or it is out of battery. Solution: Turn on the controller. If the controller does not start, replace or recharge the batteries.
Reason 2: The controller is not paired with the computer. Solution: Press and hold the pair button. The Xbox button on the controller will blink rapidly. Then the light will turn solid when paired.

If the light does not turn solid, try connecting it on your computer.
- Start button > Settings > Bluetooth & Devices
- Press “Add device”
- Select “Everything else”
StaticVR or MotionVR force plates
Below, we will cover troubleshooting for the following:
- Force plates not detected
- Inaccurate weight display
Force plates not detected
Reason: StaticVR or MotionVR not detected in the software. Solution: For StaticVR, first check the USB cable from the force plate is properly connected.
Second, launch a device detection on the Virtualis software: Administration > Devices > Launch device detection.
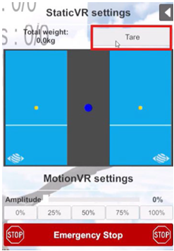
Inaccurate weight display
Reason: Inconsistent weight. Solution: Tare force plates.
Make sure your patient is not standing on the force plates. Then open any StaticVR or MotionVR module and press “tare”.
Software
Below, we will cover how to update the following:
- Virtualis application
- Windows®
- SteamVR
- VIVE Business Streaming
- NVIDIA
Virtualis application
If your system is not connected to Wi-Fi, you will need to manually perform updates. Contact your local sales representative for assistance. If you are connected to the internet, then you will be automatically prompted to complete updates.
Windows®
To check for updates manually, select the Start button > Settings > Update & Security > Windows Update > Check for updates.
SteamVR
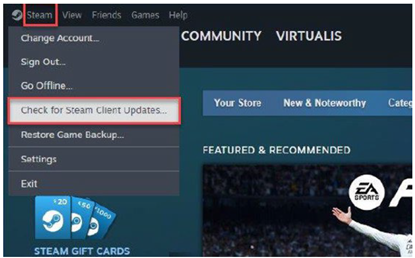
1. Open the SteamVR app.
2. Steam should automatically download the last SteamVR update. To manually check, select Steam > Check for Steam Client updates.
3. Once the update is complete, go to Library.
4. Select SteamVR.
5. Press Play to launch.
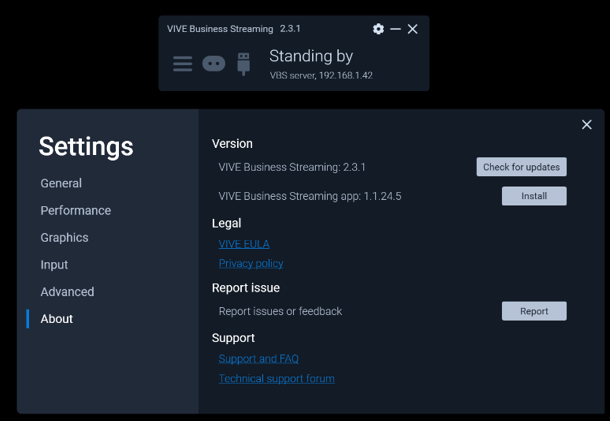
VIVE Business Streaming
To check for updates manually, select “Settings” > “About” > “Check for updates”.
NVIDIA
1. Launch NVIDIA App.
2. Check update in the Drivers menu.
3. Download and install.
4. Restart the computer.
Presenter
