

AC40 Support
Welcome to the product training for AC40 audiometer. On this page you will find an overview of all the available training materials and support.
Available Training
Audiometric Masking
In cases where you detect a symmetrical hearing loss, traditional audiometry without masking is usually sufficient. However, be aware that in cases of asymmetrical hearing loss, one cannot be certain that the intended ear is the one actually detecting the sound.
What is audiometric masking?
Audiometric masking is the process of presenting masking noise to the non-test ear while testing the other ear. Audiometric masking prevents asymmetrical hearing loss causing an erroneous measurement and can be applied in air conduction, bone conduction, and speech audiometry. Masking the better hearing ear is essential in audiometry, considering the concept of interaural attenuation.
What is interaural attenuation?
Interaural attenuation is the amount of attenuation the sound is exposed to on its way through the skull. Even though the interaural attenuation is very individual and varies with frequency, it is estimately a minimum of 40 dB for supra-aural headphones and 50 dB for inserts. Regarding bone conduction, the interaural attenuation is a minimum of 0 dB, which means that crossing over of the stimulus may occur at all times, and this is what one should assume.
 |
 |
 |
| IA ≈ 40 | IA ≈ 50 | IA ≈ 0 |
Masking example
When measuring an audiogram on a patient with hearing within the normal range on one ear, but a moderate to severe hearing loss on the other, there is a potential risk of the good ear hearing the tone when trying to test the damaged ear. That is, the sound vibration may travel through the head and be heard by the opposite good ear when the vibrations of the signal are of sufficient magnitude. Therefore, you are actually measuring the thresholds from the wrong ear. This could be the case in the example here and masking is needed in the right ear (better ear) while reassessing the left (poorer ear).
Masking is also needed to differentiate between sensorineural and conductive or mixed hearing losses. In the example, it is unknown if the loss of the left ear is sensorineural, conductive or a mixed hearing loss. The origin will be revealed by obtaining the bone conduction threshold for the left ear while occupying the right ear with masking.

Required equipment
- Headphones or insert phones
- Bone oscillator
How to perform audiometric masking
- Perform air conduction audiometry unmasked for both ears.
- Perform bone conduction audiometry unmasked for both ears.
- Apply masking if needed:
- In case there is an air-bone gap of 15dB or more, the bone conduction threshold must be reassessed while applying masking to the non -test ear.
- If the difference between the air conduction threshold of the worse ear and the bone conduction threshold of the good ear exceeds IA of 40dB (50dB if using insert phones), masking will be needed for the air conduction audiometry of the worse ear.
- Select NB in channel 2.
- Select the ear to be masked (right or left) and choose the appropriate masking transducer (head phones or insert phones). This will activate the masking noise.
- Proceed to do a masked threshold search and press Store once a correct threshold has been obtained. The symbol will appear in the audiogram as masked. There are many ways of applying clinical masking. Which one to use is your decision. Regardless of the masking method, channel 2 is used to occupy the better ear.
- To display the masking level information on the screen, select Mask info.
In the example above, channel 2 should be set to Right (non-test ear) using the preferred masking stimulus (usually NB). Ensure that Rev is active to ensure that the masking noise is continuous. Channel 1 should be set to Left (test ear) using the preferred stimulus (usually Tone). The masking frequency will automatically change along with the tone frequency when masking is turned ON. You can set the masking and tone frequencies by using the Frequency Up Down buttons. While trying to establish the true threshold of the left ear, the right ear is now distracted with noise.
When storing a threshold while masking, the final masking level is stored in the masking table under the ear that is being tested. The terms ‘Effective masking’ in this situation refers to the fact that the narrow band noise level was loud enough to effectively mask a pure tone of the indicated level heard by the masked ear.
Auto masking
Interacoustics auto masking is available to ease the effort required in order to mask with correct masking levels. When auto masking is enabled, channel 2 is controlled by the system and is set to the appropriate intensity level.
|
Auto masking is activated by selecting the icon that shows the mask with letter A. |
|
|
Green indicates that masking is correctly applied. |
|
|
Amber indicates that masking is recommended louder and that extended range needs to be activated to allow setting channel 2 to the correct level. |
|
|
Purple indicates that masking would be needed, but is not possible practically. |
Note: The auto masking feature is only available in the Diagnostic Suite – and not on the audiometer as a standalone.
Caveats
Be aware that patients require proper instructions before audiometry with masking is undertaken. The switching on and off of the masking noise may be uncomfortable to some patients and cause them to become more fatigued. In some cases (when testing young children, some elderly patients or difficult to test patients), it is recommended not to use masking because confusion about the application of masking noise may lead to false responses.
When measuring the second test ear, more information becomes available and it is not guaranteed that the earlier measurements are still correct. By measuring the best ear first and completing air conduction on both ears before measuring bone conduction, most errors can be avoided.
Be careful when storing thresholds where masking was not possible. Masking not possible means that the risk for crossover hearing is high. In these cases it is recommended to store a no-response at the loudest intensity where masking was still possible (by pressing the N key).
Terminology
| AC | Air conduction test ear |
| ACc | Air conduction non-test ear |
| BC | Bone conduction test ear |
| BCc | Bone conduction non-test ear |
| IaA | Minimum interaural attenuation |
| IaAc | Minimum interaural attenuation contra transducer |
| Dial | Dial setting test ear |
| Dialc | Dial setting contra (masking level) |
Is masking required?
Masking is recommended when the presentation at the test ear can be heard by at the contralateral side, or in a formula:
Dial – IaA ≥ lowest of ACc and BCc
Is the masking level too low?
The applied masking level is too low when the applied masking level does not match the intensity at which the test signal is heard in the contralateral ear, or in a formula:
Dialc – (ACc – BCc) < Dial – IaA
Is the masking level too high?
The applied masking level is too high when the masking level is so loud that it potentially is heard by the test ear, or in a formula:
Dialc – IaAc ≥ Dial – (AC – BC) when testing air conduction
Dialc – IaAc ≥ Dial when testing bone conduction
Is masking impossible?
Masking is not possible when the needed masking level results in overmasking at the same time:
Dial + (ACc – BCc) – IaA ≥ Dial – (AC – BC) + IaAc when testing air conduction
Dial + (ACc – BCc) – IaA ≥ Dial + IaAc when testing bone conduction
or when the needed masking level is higher than the maximum level of the masking transducer:
Dial + (ACc – BCc) – IaA > maximum available Dialc
Recommended masking intensity
The masking help can indicate a recommended masking intensity. If masking is indeed required and also possible, the recommended masking intensity is given by the minimum required masking level plus a fixed preferred amount:
Recommended Dialc = Dial – IaA + (ACc – BCc) + preferred additional amount.
The recommended masking level is adjusted for values that cannot be reached by the masking transducer due to maximum values.
When the auto masking feature is used, masking intensities are set to the recommended intensity.
Of course if “extended range” is not switched on, the masking intensities are thereby limited accordingly.
Frequency specific inter-aural attenuation
The inter-aural attenuations used by the masking help are frequency specific and can be customized in the setup. The following table shows the default inter-aural attenuation values (IaA). These are partly based on recommendations from the Handbook of Clinical Audiology and are otherwise slightly more conservative then recent publications and will therefore allow for appropriate decision making.
|
Frequency (Hz) |
125 |
250 |
500 |
750 |
1000 |
1500 |
2000 |
3000 |
4000 |
6000 |
8000 |
|
IaA Headphones (dB) |
35 |
40 |
40 |
40 |
40 |
40 |
40 |
45 |
50 |
50 |
50 |
|
IaA Inserts (dB) |
50 |
50 |
50 |
50 |
50 |
50 |
50 |
50 |
50 |
50 |
50 |
|
IaA Bone (dB) |
0 |
0 |
0 |
0 |
0 |
0 |
0 |
0 |
0 |
0 |
0 |
Recommendations
Experienced audiologists are recommended not to use the option of viewing a suggested masking level.
The masking help indicates if masking is performed correctly with the information given at the time of the measurement. When measuring the second ear, more information becomes available and it is not guaranteed that the earlier measurements are still correct. By measuring the best ear first and completing air conduction on both ears before measuring bone conduction, most errors can be avoided.
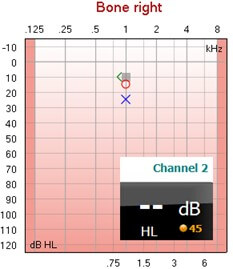
Although clinicians do often not apply masking for bone conduction in the instance where the air-bone gap is less than 15dB in the better ear, it can be recommended to apply masking to make the measure ear specific. Despite that an experienced clinician would disagree, the masking will, in these cases recommend, that masking is needed. This figure illustrates such a situation.
Masking help
Interacoustics masking help is available to make it easier to decide on a safe and correct masking intensity. When masking help is activated, a status light on channel 2 indicates if masking is applied correctly.
|
Masking help is activated by selecting the icon with the mask. |
|
|
Grey indicates that the masking help is not active. Green indicates that masking is correctly applied. |
|
|
Optionally, the masking help can give a suggested masking level. The example here shows that 85 dB, but also 75dB is within the safe masking range. |
|
|
Amber indicates that masking is recommended differently. There is either too much or too little masking. |
|
|
Purple indicates that masking would be recommended, but is not practically possible. |
Note The masking feature is only available in the Diagnostic Suite – and not on the audiometer as a standalone.
Recommendations
Because several masking intensities will usually be correct, experienced audiologists are recommended to use the masking help without displaying the recommended masking level.
When measuring the second ear, more information becomes available and it is not guaranteed that the earlier measurements are still correct. By measuring the best ear first and completing air conduction on both ears before measuring bone conduction, most errors can be avoided.
Clinicians do often not apply masking for bone conduction in the instance where the air-bone gap is less than 10dB in the better ear. Against general practice, masking help will always recommend that masking is needed in these cases.